MDF Down Home Meatloaf …redefined

Meatloaf Sandwich by Modern Day Forager

MDF Down Home Meatloaf 

One of the best feel-good foods is our next go-to sandwich, the humble old fashioned meatloaf sandwich.  We would venture to guess, that just about every family has a recipe that has been handed down from generation to generation of this down-home classic.

With so many variations, this American staple may be customized to your liking, there are so many choices, such as the addition of oatmeal, crumbled cheese, hard-boiled egg, and even a blanket of bacon to keep the loaf moist, flavorful and tender, the options are endless.

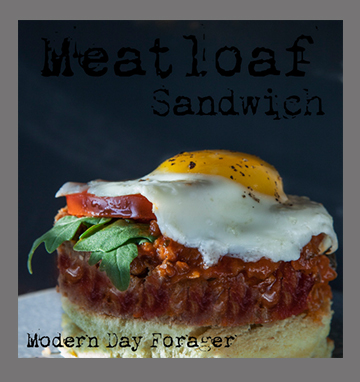
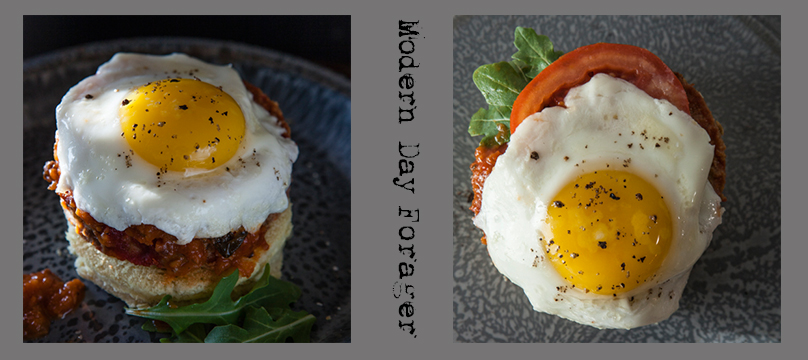
Our mighty meatloaf is open-faced, packed with high-quality meat, our MDF ketchup, a rustic toasted roll, and if that wasn’t enough, we have crowned it with a fried egg.  It couldn’t be more comforting or satisfying.

The secret to making this recipe, is to keep the mixing and handling to a minimum, keeping the loaf moist and tender.  Our tasty tangy ketchup adds to the moistness and the concentrated flavor is hearty, thick and chunky.  Next, we added crisp peppery rocket leaves and juicy ripe heirloom tomatoes for a pop of freshness.  Then a farmer’s egg, which just takes it over the top, the runny yellow yolk, for us, makes it our ultimate comfort food.  The prep to plate for this tried-and-true classic takes no time at all and is worth making over and over.  Adding this recipe to your collection is a must.

MDF Down Home Meatloaf Sandwich

Ingredients:

  • Rustic style roll (we served our’s open faced and used the the bottom of the roll)
  • Generous slice of MDF Meatloaf (recipe below)
  • MDF Glaze (recipe below)
  • Rocket leaves to taste
  • Thick slice of Heirloom tomato
  • 1 egg
  • Salt and freshly ground black pepper

Directions:

  1. Butter bottom of roll and place butter side down on a griddle or medium heat skillet to toast.
  2. Brown meat loaf slice on both sides in 1 teaspoon of olive oil in skillet or on griddle until heated through.
  3. Fry sunny side up egg.
  4. Place meatloaf slice on toasted bread, top with MDF ketchup to taste then add tomato and rocket leaves.
  5. Top with fried egg.
  6. Season with salt and pepper.

Options for other toppings:

Fried onions, cheddar cheese, Monterey jack cheese, pepper jack cheese, sliced jalapenos, dill pickles, or bread and butter pickles.

Ingredients:

  • 1/2 
cup yellow onion, minced
  • 3 
cloves garlic, minced
  • 1
 tablespoon Worcestershire sauce
  • 3/4 cup fresh bread crumbs
  • 1/2
 pound ground beef
  • 1/2 
pound ground pork
  • 1/2
 pound ground veal
  • 1/2 
teaspoon salt
  • 1/2 teaspoon pepper
  • 1/2
 teaspoon fresh ground black pepper
  • 1
 egg, beaten
  • 1/2
 cup milk

Directions:

  1. Preheat oven to 350 F.
  2. In a large bowl, mix onion, garlic, Worcestershire and bread crumbs together.
  3. Combine ground meats with breadcrumb mixture.
  4. Season the meat mixture with salt and pepper.
  5. Add the egg and milk combine thoroughly, but don’t over work the meat.
  6. Use a greased loaf pan as your mold, (or use your hands to free form) fill it, lightly packing then turn the meatloaf out onto a lined baking sheet.
  7. Bake for approximately 90 minutes, glazing after 10 minutes, 30 minutes and 60 minutes.  Until the internal temperature is 160 degrees F and the meat loaf is cooked through.
  8. Once cooked, remove from the oven and let it cool, about 90 minutes.

Glaze:

  • 1/2 cup MDF Ketchup
  • 1 teaspoon cumin
  • 1 tablespoon honey
  • 1/4 teaspoon Worcestershire sauce
  • 1/4 teaspoon Tabasco sauce

Combine all the ingredients in a small bowl and spoon over the meatloaf after 10 minutes cooking time and again after 30 minutes and again at 60 minutes.

Meatloaf Sandwich by Modern Day Forager

Recipes by Rj of Urban Table
Photo Styling & Art Direction by Traci of Urban Table
Photography & Art Direction by Heather of Heather Gill Photography
Modern Day Forager

Open Faced Grilled Cheese with Creamy Tomato Soup

Grilled Cheese and Tomato Soup by Modern Day Forager

Recipes by Rj of Urban Table
Photo Style & Art Direction by Traci of Urban Table

Photography & Art Direction by Heather of Heather Gill Photography

Tomato Soup by Modern Day Forager

One of my most cherished memories of eating an open faced grilled cheese sandwich,  a steamy bowl of creamy tomato soup and a cold glass of milk, is when I was a little girl and my GG , would lovingly prepare me this meal for me whenever I was sick, stayed home from school, or needed some extra TLC.  There is just nothing better than having your Grandma take care of you and her making your favorite comfort foods.  I could always count on her to do that for me and make me feel special.   As a I grew older, the tables had turned , and I was the one lovingly preparing this recipe for my GG to comfort her when she was ill.  I will always be very grateful for the time I got to spend with her.

Ingredients:

For the creamy tomato soup:

  •             4 lbs. ripe heirloom tomatoes
  •             2 T olive oil
  •             1 T unsalted butter
  •             2 stalks celery, finely chopped
  •             1/3 cup shallots, finely chopped
  •             1/2 cup chicken stock, or as needed
  •             1 t fresh basil, chiffonade, extra for garnish
  •             1/2 t sugar
  •             1/2 cup heavy cream
  •              salt and freshly ground pepper to taste

Grilled Cheese and Tomato Soup by Modern Day Forager

For the grilled cheese: 

  • 3/4 lb. mild cheddar cheese, thinly sliced
  • 6 slices whole grain bread
  • 1/2 pound cream cheese, softened
  • 4 Tbs. unsalted butter, at room temperature

Directions:  To make the soup, preheat an oven to 400°F.  Lightly oil a rimmed baking sheet. Cut the tomatoes in half lengthwise and place them, cut side up, on the prepared baking sheet and brush with olive oil.  Roast until the tomatoes look somewhat shriveled, about 45-50 minutes.  Let cool for about 20 minutes.  Transfer the tomatoes and any juices to a food processor, pulse until chopped, then put the tomatoes and their juices through a food mill placed over a bowl.  You should have about 3 1/2 cups tomato purée.  Discard the contents and tomatoes skins from the food mill.
 
In a large saucepan, melt the butter over medium-low heat.  Add the celery and cook, stirring occasionally, until tender, about 5 minutes.  Add the shallots and cook, stirring occasionally, until softened, about 3 minutes.
 
Stir in the tomato purée, 1/2 cup stock, and the basil and bring to a simmer over medium-high heat.  Reduce the heat to medium-low and simmer, uncovered, for about 15 minutes.  Stir in the sugar. In 3 or 4 batches, transfer the soup to a blender and process until smooth.  Transfer to a clean saucepan; add the cream and heat until piping hot but not boiling.  If the soup seems too thick, thin with more stock.  Season to taste with salt, pepper and garnish with fresh basil leaves and serve warm.  To make the open face grilled cheese sandwiches; heat a griddle or 2 large frying pans over medium heat until hot.  For each sandwich, place one-fourth of the cheese on top of bread slice and top cream cheese, then layer with fresh tomatoes, season with salt, pepper and garnish with extra basil.  Place on the griddle, reduce the heat to medium-low and cook until the undersides are golden brown, 3–4 minutes.  Ladle the soup into warmed bowls.  Serve and enjoy!!!
Grilled Cheese and Tomato Soup by Modern Day Forager

Modern Day Forager

Grandma’s Donuts

HeatherGill-25

Recipes by Rj of Urban Table

Photo Styling & Art Direction by Traci of Urban Table

Photography & Art Direction by Heather of Heather Gill Photography

Donuts-3

Donut or Doughnut …no matter how you spell it, there may be nothing more satisfying to put in your mouth than a hot and fresh one of these old fashioned, hand-cut pieces of fried dough.

Ingredients:

  • • 4 cups flour
  • • 1 cup sugar
  • • 1 1/2 teaspoon salt
  • • 2 tablespoon baking powder
  • • 1/4 teaspoon nutmeg
  • • 1 cup milk
  • • 2 eggs, beaten
  • • 1 quart oil for frying

Powdered sugar and/or cinnamon sugar (I liked to switch off, while grandpa stuck with plain dunked into his coffee)

Donuts-6

Directions:

Pre-heat oil in a large Dutch oven or pot to approximately 375 F.

Combine flour, sugar, salt, baking powder and nutmeg.

Stir in milk and eggs.

(This step was done by hand on a large floured cutting board in grandma’s kitchen) Divide dough into easy to work with portion and spread out to about 1/4 inch thickness.

Cut out donuts (Grandma use two biscuit cutters to cutout donuts. She did not make donut holes so she just kept re-using the center piece.)

Once you have cut out all your donuts drop them into hot oil, just a few at a time. Fry about 3 minutes, turn and fry for about 3 more minutes or until golden brown.

Drain: (Grandma always tore a brown paper bag and set that on a plate to drain the donuts… never really a necessary step since my grandfather and I ate them as fast as she could make them, which always created plenty of giggles.)

Sprinkle with powdered sugar, cinnamon-sugar, or neither, just plain.

Eat and enjoy! 

Donuts-1

Modern Day Forager

Strawberry Shortcake

grandma-22

Recipes by Rj of Urban Table

Photo Styling & Art Direction by Traci of Urban Table

Photography & Art Direction by Heather of Heather Gill Photography

grandma-21

Strawberry Shortcake

Ingredients:

4 cups fresh strawberries – tops cut off and sliced thinly (remove 1/2 cup and mash)

1/2 cup sugar

Directions:

Combine 1/2 cup sugar and 1/2 cup crushed strawberries.  They will be syrupy.  Add this to the remaining sliced strawberries.  Serve over biscuits and top with fresh whipped cream.

Whipped Cream

Ingredients:

· 1 cup heavy cream

· 1 tablespoon confectioners sugar

· 1 teaspoon Vanilla extract

Directions:

In a large bowl, whip cream until stiff peaks are just about to form. Beat in vanilla and sugar until stiff peaks form.  Make sure not to over-beat, or you will have butter.

grandma-24

We used the biscuits from yesterdays post.  In case you didn’t catch it here is the recipe again.

Gran’s biscuits are all gussied up with macerated strawberries and old fashion whipped cream.  Change up the ingredients and embellish with 1/2 cup of crumbled bacon and 1 cup of buttermilk to the dough and now you have a rich and creamy savory biscuit

Grandma’s Biscuits

Ingredients:

1/2 cup leaf lard, cold and coarsely chopped plus more to grease pan

2 1/4 teaspoons active dry yeast

1/4 cup of warm water (105F-110F)

2 1/2 cups all purpose flour

2 tablespoons sugar

1 teaspoon salt

1 teaspoon coarse pepper

3/4 teaspoon cream of tartar

1 1/2 teaspoons baking soda

1 cup yogurt

Directions:

  1. Preheat oven to 425F.  Grease baking sheet with lard and set aside.
  2. In a small bowl, dissolve yeast in warm water, let stand until it becomes foamy (5-10 minutes).
  3. In a large bowl, combine the flour, sugar, baking powder, salt, pepper, cream of tartar and baking soda.  With a pastry blender or two knives, cut the lard into the flour mixture until pea sized coarse crumbs form.
  4. Make a well in the center of the flour mixture, add yogurt and yeast all at once and carefully toss with a fork until just moistened, careful to not over mix.
  5. Flour your work surface; roll out the dough to 3/4 of an inch thickness using a rolling pin.
  6. Cut the biscuits using a 2 1/2 inch round biscuit cutter.  Gather trimmings re-roll and cut.
  7. Place biscuits 1 inch apart on the prepared baking sheet.  Bake for 12-15 minutes until golden brown.  Leave to cool for 5 minutes on wire rack, serve warm.*** For a MDF take on Grandma’s Classic ***Replace vanilla extract with balsamic vinegar or any of your favorite extracts and/or bitters, then for an urban table twist try a chiffonade of basil.

grandma-23


Modern Day Forager

Grandma’s Biscuits

grandma-13

Recipes by Rj of Urban Table

Photo Styling & Art Direction by Traci of Urban Table

Photography & Art Direction by Heather of Heather Gill Photography

grandma-14

Here is a tried and true recipe from my dear grandma who made these by the dozens for my family and boy did we feel special when she made them and  we ate them.  If you master these biscuits and know your biscuit basics you will be on your way to making a mouth-watering golden brown biscuit with a soft and tender interior.

My Grandma’s Biscuits

1/2 cup leaf lard, cold and coarsely chopped plus more to grease pan

2 1/4 teaspoons active dry yeast

1/4 cup of warm water (105F-110F)

2 1/2 cups all purpose flour

2 tablespoons sugar

1 teaspoon salt

1 teaspoon coarse pepper

3/4 teaspoon cream of tartar

1 1/2 teaspoons baking soda

1 cup yogurt

  1. Preheat oven to 425F.  Grease baking sheet with lard and set aside.
  2. In a small bowl, dissolve yeast in warm water, let stand until it becomes foamy (5-10 minutes).
  3. In a large bowl, combine the flour, sugar, baking powder, salt, pepper, cream of tartar and baking soda.  With a pastry blender or two knives, cut the lard into the flour mixture until pea sized coarse crumbs form.
  4. Make a well in the center of the flour mixture, add yogurt and yeast all at once and carefully toss with a fork until just moistened, careful not to over mix.
  5. Flour your work surface; roll out the dough to 3/4 of an inch thickness using a rolling pin.
  6. Cut the biscuits using a 2 1/2 inch round biscuit cutter.  Gather trimmings, re-roll and cut.
  7. Place the biscuits 1 inch apart on the prepared baking sheet.  Bake for 12-15 minutes until golden brown.  Leave to cool for 5 minutes on a wire rack, serve warm.

grandma-23

Modern Day Forager

Simple Freezer Jam

grandma-8

Recipes by Rj of Urban Table

Photo Styling & Art Direction by Traci of Urban Table

Photography & Art Direction by Heather of Heather Gill Photography

grandma-10


We don’t know about your grandmas’ but ours made freezer jam every summer. We remember picking the fruit for grandma to use, she really didn’t get many since we were allowed to eat as we picked, but that was half the fun!

If you don’t like to can, this is for you.  Freezer jams use less sugar and you if you prefer you can omit pectin.  We are giving you 2 recipes today – one with pectin and one without.  We used Ball products for this jam, they have great plastic containers and we have always had success using their pectin for freezer and canned jams.

Freezer Jam – with pectin

4 cups strawberries or peaches (any fruit – peeled (if needed) and crushed)

1 1/2 cups sugar

1 package of freezer jam pectin

Combine all ingredients and put in plastic jars.  Let them set up for 30 minutes before putting them in the freezer.  Put one in the refrigerator a couple hours before you want to use.  And how simple that its no cook.

We love to eat this jam on homemade bread!  With fruit being just about perfect right now, this is something you could do tonight and use this weekend.

grandma-9


Our grandmothers would never have made mango lime but we would!  So for this one we put super ripe mangos and fresh limes without pectin together.

Freezer Jam – without pectin

4 cups mangos – peeled and crushed

Juice and pulp from 4 limes – we used a citrus reamer

1 1/2 cups sugar

Combine all ingredients in a medium sauce pan and cook on low for about 30 minutes.  Let cool for a bit (8-10 minutes) then add jam to plastic jars (we used Ball) and let cool completely before adding lids and transferring them to the freezer.  You can also cool them in a water bath if you like to speed up the process and keep them out of the danger zone, 40-140 degrees.

You can substitute almost any fruit with this.  We chose mango and lime together not only because its tasty but also because the lime helps with the natural pectin that is lower in mango.  Both of these recipes  would double well if you want to make a larger quantity.

We would love to know if your grandmother made jam.  Did you get to help?  And if so, what part did you play?  Please connect with us in the comments or on our Facebook page.

grandma-7

Modern Day Forager

Celebrating Our Grandmothers

Granny, grandma, grandmother, nana, nona. Whatever you called her we are celebrating her and time honored traditions this week.  For us at MDF, our grandmas centered around cooking, eating and family.   Their recipes were always lovingly prepared and harken back to a simpler time.  Everything depended on what was at hand, available and fresh in the garden and nothing was ever wasted.  No shortcuts were ever taken and many of the meals we have all grown so fond of, came out of the kitchen because of necessity to stretch a meal or a dollar.

grandma-2

Our grandmothers stories, recipes and wonderful anecdotes enriched our lives and awakened our love for food and feeding people.

grandma-5

grandma-4

Over the coming days we will share with you some charming stories, treasured family recipes, steeped in tradition and what we like to call “grandma-isms or  our version of grandma sayings.”   We would love to hear about your grandmother.  What do you remember about her?  Do you make recipes that she made for you as a child?  Please connect with us in the comments section or on our Facebook page.

grandma-1

vintage place mat photo by Bob’s Your Uncle

Modern Day Forager