A whole new kind of club…stacked!

Triple Decker Roast Beef with Horseradish Kewpie Mayonnaise by Modern Day Forager

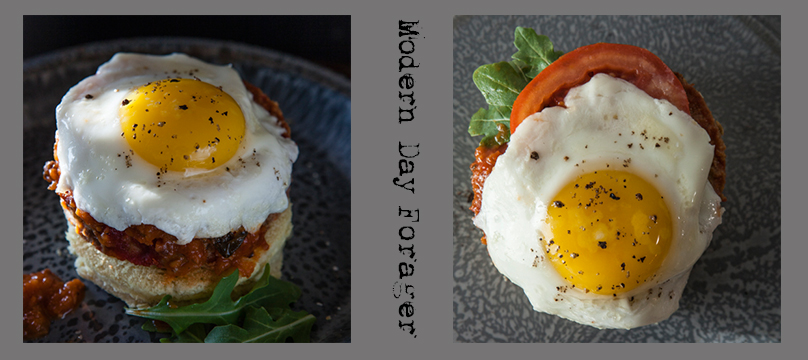
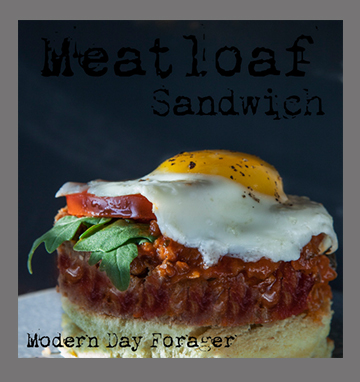
An all-time diner favorite, this mile-high club is our last sandwich this week, with a HG twist.  This triple decker tower of ingredients layered with artisan bread is truly a showstopper.

Reclaim dinner this week, with this rich and satisfying robust sandwich.  Who says you can’t serve sandwiches for dinner?  Don’t just think of sandwiches for livening up lunch.  With school in full swing, and everyone’s hectic schedules this fall, we decided to make Heather’s go-to  weeknight staple, her take of the roast beef club.

Triple Decker Roast Beef with Horseradish Kewpie Mayonnaise by Modern Day Forager

The clubhouse or also known as the Dagwood is on the rise, here at MDF.  Heather built this decadent meaty sandwich with style, care and flair.

First and foremost, you should know that Heather goes to great lengths to curate high-end carefully sourced ingredients, so with that in mind, she started with rich toasted dark rye and it grew from there, slathering our version of Kewpie mayo with the addition of fresh grated horseradish and chopped woodsy rosemary.  Then added fresh crisp greens, juicy ripe plum tomatoes, smooth but slightly tangy Muenster (cow’s milk cheese with a thick orange rind) and mounds of slow roasted, thinly sliced, rosy pink roast beef.

Highly anticipated for this combination of flavors and textures, this beauty was a huge hit in our test kitchen as Heather crafted her three-story stack of goodness for our photo shoot.  At the end of the day, the result was a hearty dinner which was ready in no time, and boy was that a good thing, because boy were we hungry.

Triple Decker Roast Beef Club with Horseradish Kewpie Mayonnaise

Ingredients:

Makes 2 large sandwiches

  • 1/2 pound roast beef
  • 1/2 pound Munster cheese – sliced very thin
  • Horseradish Kewpie Mayonnaise (recipe below)
  • Leaf Lettuce
  • Roma Tomatoes – sliced thin
  • 6 slices or Dark or Marble Rye Bread
  • Tooth picks – you will need them!

Directions:

  1. Toast the bread and spread horseradish Kewpie mayonnaise on 3 sides.
  2. Build the sandwiches–first with a layer of lettuce, then tomato, then cheese, then roast beef.
  3. Top with another layer of bread and add to that lettuce, then tomato, then cheese, then roast beef and the last piece of bread.
  4. Add toothpicks to help hold together.  Find someone to share this with, it’s a big sandwich!

Kewpie Horseradish Mayo

Ingredients:

  • 1/3 cup MDF Kewpie mayonnaise
  • 2 tablespoons prepared white horseradish
  • 1 teaspoon chopped fresh rosemary
  • Salt and freshly ground pepper

Directions:

  1. Whisk Kewpie mayo, horseradish and rosemary in small bowl and season with salt and pepper.
Recipes by Rj of Urban Table
Photo Styling & Art Direction by Traci of Urban Table
Photography & Art Direction by Heather of Heather Gill Photography
Modern Day Forager

Modern meets Old Fashioned…

Old Fashioned Pastrami Sandwich from Modern Day Forager

Modern’s Old Fashioned Pastrami on Rye

Paying tribute to an old fashioned deli masterpiece.  One of the simplest, most familiar, sandwiches is pastrami on rye, and for many, it is the king of all sandwiches.

Foolproof, this  rich silky, garlicky, peppery and piled sky-high pastrami needs no bells or whistles.  The magic happens, when crafting the meat– curing, spicing, crusting, smoking and steaming.  Then, all that is needed is soft chewy seeded rye, one that has some sourness to it, along with a dusting of cornmeal on the bread’s surface.  The bread must be warm (a must) and is the perfect vehicle to add a heaping helping of Modern’s Stout Mustard, which never disappoints.  So curate high-quality meat or make your own.  This iconic sandwich is as straight-forward as it gets, but provides a taste that you remember and want over and over, keeping  you coming back for more.

I could not blog about pastrami without mentioning my favorite place in the world to have this sandwich, and it is not even in NYC.  For me, Langer’s in LA, downtown LA no less, is  truly the very best.  It is a pastrami mecca, and the pastrami sandwich is taken very seriously at this landmark restaurant.  So, if you are ever in Los Angles, this is a must-have sandwich.

Langer’s Deli

704 S. Alvarado Street

Los Angles ,90057

+ 213.483.8050  langersdeli.com

Old Fashioned Pastrami with Stout Mustard by Modern Day Forager

Modern’s Old Fashion Pastrami on Rye

Ingredients:
  • 12 ounces thick cut pastrami  (Purchased from your local deli or make your own, recipes below)
  • 4 slices of rye bread
  • 2 tablespoons MDF Stout Mustard
  1. Place pastrami in a skillet over medium high heat.  Cook until fat of pastrami starts to steam, cover with two slices of rye bread.  Steam bread to warm, remove bread, flip over pastrami.   Cover with remaining rye bread and steam.
  2. On your work surface, place 2 slices of steamed rye bread and spread each with 1 tablespoon MDF Stout Mustard.  Layer each bread slice with 6 oz. thick cut pastrami; place two remaining slices of bread on top of pastrami.
  3. Enjoy! 

Variations:

  • Layer pastrami, sautéed onions and Thousand Island dressing on rye bread.
  • Top with house made cole slaw
  • Swiss Cheese
  • Horseradish sauce
  • Slice Pastrami thin and pile high

Home-Cured Beef Pastrami by Michael Ruhlman on Ruhlman.com

Ingredients:

  • 6 ounces or 3/4 cups kosher salt
  • 3 ounces or ½ cup sugar
  • 2 teaspoons pink salt, optional
  • 5 cloves garlic, smashed with the flat side of a knife
  • 4 tablespoons pickling spice
  • 1 5-pound beef brisket, the more fat it has the better

Rub:

Ingredients:

  • 1 tablespoon peppercorn, toasted and ground (or as needed)
  • 1 tablespoon coriander seed, toasted and ground (or as needed)

Directions:

  1. In pot large enough to hold brisket, combine 1 gallon/4 liters of water with kosher salt, sugar, sodium nitrite (if using), garlic and 2 tablespoons pickling spice.  Bring to a simmer, stirring until salt and sugar are dissolved. Remove from heat and let cool to room temperature, then refrigerate until chilled.
  2. Place brisket in brine, weighted with a plate to keep it submerged; cover.  Refrigerate for 2 days if it’s thin, a third day if it’s thick.
  3. Remove brisket from brine and rinse thoroughly.  Refrigerate it for another day uncovered (this is best, to let cure equalize, but if you can’t wait, that’s ok too).
  4. Combine the pepper and coriander and coat the brisket with it.   Smoke and cook the brisket, till tender, as described above.  Slice thinly to serve.  This will keep for a week in the refrigerated.  Steam it to reheat or reheat covered in a microwave (gently).

Pickling Spice

Ingredients:

  • 2 tablespoons black peppercorns
  • 2 tablespoons mustard seeds
  • 2 tablespoons coriander seeds
  • 2 tablespoons hot red pepper flakes
  • 2 tablespoons allspice berries
  • 1 tablespoon ground mace
  • 2 small cinnamon sticks, crushed or broken into pieces
  • 2 to 4 bay leaves, crumbled
  • 2 tablespoons whole cloves
  • 1 tablespoon ground ginger

Directions:

  1. Combine peppercorns, mustard seeds and coriander seeds in a small dry pan.  Place over medium heat and stir until fragrant, being careful not to burn them; keep lid handy in case seeds pop.  Crack peppercorns and seeds in mortar and pestle or with the side of a knife on cutting board.
  2. Combine with other spices, mix.  Store in tightly sealed plastic or glass container.

Pastrami Recipe for use with Smoker and Cherry Wood

Ingredients:

  • 1/2 cup kosher salt
  • 1/2 cup brown sugar
  • 1/4 cup black peppercorns
  • 4 tablespoons coriander seeds
  • 5 cloves garlic, smashed
  • 2 bay leaves
  • 5 to 6 pound brisket flat, trimmed
  • 1 qt beef stock
  • 2 12 ounce bottles of beer
  • 3/4  gallon cold water
  • 4 tablespoons pickling spices
  • 4 bay leaves
  • 2 tablespoons additional juniper berries
  • 2 tablespoons additional black peppercorns

Directions:

  1. Place peppercorns and coriander seeds in a grinder and grind until coarsely chopped.  Mix the salt, sugar, garlic, and ginger with the seasonings from the grinder.
  2. Reserve 1/4 of the seasonings.  Rub the flat thoroughly on all sides with seasonings.  Wrap in plastic wrap, then aluminum foil.  Place in a glass pan in the refrigerator.  Turn daily for at least one week, up to two weeks is better. Remove brisket from all wrappings.  Place on rack in pan so it can drain, and put uncovered in refrigerator  overnight, until very dry.
  3.  Prepare smoker with cherry wood at lowest temperature while still producing smoke.   Place cold flat in the smoker. Smoke for 3 hours,
  4. Remove  from smoker and place in a large dutch oven.  Cover  with  beef stock, beer and water.  Add the reserved rub, the pickling spice, the bay leaves, the additional juniper berries, and the additional black peppercorns.
  5. Simmer covered until tender about 3 hours.
  6. Remove from pot and slice. (cut across grain)
Recipes by Rj of Urban Table
Photo Styling & Art Direction by Traci of Urban Table
Photography & Art Direction by Heather of Heather Gill Photography


Modern Day Forager

MDF Down Home Meatloaf …redefined

Meatloaf Sandwich by Modern Day Forager

MDF Down Home Meatloaf 

One of the best feel-good foods is our next go-to sandwich, the humble old fashioned meatloaf sandwich.  We would venture to guess, that just about every family has a recipe that has been handed down from generation to generation of this down-home classic.

With so many variations, this American staple may be customized to your liking, there are so many choices, such as the addition of oatmeal, crumbled cheese, hard-boiled egg, and even a blanket of bacon to keep the loaf moist, flavorful and tender, the options are endless.

Our mighty meatloaf is open-faced, packed with high-quality meat, our MDF ketchup, a rustic toasted roll, and if that wasn’t enough, we have crowned it with a fried egg.  It couldn’t be more comforting or satisfying.

The secret to making this recipe, is to keep the mixing and handling to a minimum, keeping the loaf moist and tender.  Our tasty tangy ketchup adds to the moistness and the concentrated flavor is hearty, thick and chunky.  Next, we added crisp peppery rocket leaves and juicy ripe heirloom tomatoes for a pop of freshness.  Then a farmer’s egg, which just takes it over the top, the runny yellow yolk, for us, makes it our ultimate comfort food.  The prep to plate for this tried-and-true classic takes no time at all and is worth making over and over.  Adding this recipe to your collection is a must.

MDF Down Home Meatloaf Sandwich

Ingredients:

  • Rustic style roll (we served our’s open faced and used the the bottom of the roll)
  • Generous slice of MDF Meatloaf (recipe below)
  • MDF Glaze (recipe below)
  • Rocket leaves to taste
  • Thick slice of Heirloom tomato
  • 1 egg
  • Salt and freshly ground black pepper

Directions:

  1. Butter bottom of roll and place butter side down on a griddle or medium heat skillet to toast.
  2. Brown meat loaf slice on both sides in 1 teaspoon of olive oil in skillet or on griddle until heated through.
  3. Fry sunny side up egg.
  4. Place meatloaf slice on toasted bread, top with MDF ketchup to taste then add tomato and rocket leaves.
  5. Top with fried egg.
  6. Season with salt and pepper.

Options for other toppings:

Fried onions, cheddar cheese, Monterey jack cheese, pepper jack cheese, sliced jalapenos, dill pickles, or bread and butter pickles.

Ingredients:

  • 1/2 
cup yellow onion, minced
  • 3 
cloves garlic, minced
  • 1
 tablespoon Worcestershire sauce
  • 3/4 cup fresh bread crumbs
  • 1/2
 pound ground beef
  • 1/2 
pound ground pork
  • 1/2
 pound ground veal
  • 1/2 
teaspoon salt
  • 1/2 teaspoon pepper
  • 1/2
 teaspoon fresh ground black pepper
  • 1
 egg, beaten
  • 1/2
 cup milk

Directions:

  1. Preheat oven to 350 F.
  2. In a large bowl, mix onion, garlic, Worcestershire and bread crumbs together.
  3. Combine ground meats with breadcrumb mixture.
  4. Season the meat mixture with salt and pepper.
  5. Add the egg and milk combine thoroughly, but don’t over work the meat.
  6. Use a greased loaf pan as your mold, (or use your hands to free form) fill it, lightly packing then turn the meatloaf out onto a lined baking sheet.
  7. Bake for approximately 90 minutes, glazing after 10 minutes, 30 minutes and 60 minutes.  Until the internal temperature is 160 degrees F and the meat loaf is cooked through.
  8. Once cooked, remove from the oven and let it cool, about 90 minutes.

Glaze:

  • 1/2 cup MDF Ketchup
  • 1 teaspoon cumin
  • 1 tablespoon honey
  • 1/4 teaspoon Worcestershire sauce
  • 1/4 teaspoon Tabasco sauce

Combine all the ingredients in a small bowl and spoon over the meatloaf after 10 minutes cooking time and again after 30 minutes and again at 60 minutes.

Meatloaf Sandwich by Modern Day Forager

Recipes by Rj of Urban Table
Photo Styling & Art Direction by Traci of Urban Table
Photography & Art Direction by Heather of Heather Gill Photography
Modern Day Forager

Shop Girl for Ice Cream

As we wrap up our week of ice cream we wanted to give you a few things we love for making this wonderful treat.  Memories come flooding back about summers of our youth.  Many a summer was spent gathering up supplies to make our fresh churned ice cream. Boring but was always the favorite, vanilla.  Sometimes adding miniature chocolate chips.

It was never super hard and would melt very fast on a hot summer day.  It always seemed at the time to take forever to make it, adding the crushed ice around the outside of the aluminum freezer.  Adding rock salt to help it melt and then adding more.

The first bite was so satisfying and worth every minute of the time it took to make it.  This first item reminds me so much of the summers when my daddy would say, ‘Let’s make some ice cream.”

Buffalo-Tools-6-qt.-Electric-_-Hand-Ice-Cream-Maker

We found this on Wayfair.  There are many newer and less labor intensive models to choose from but this reminds me of what we used growing up.  This is sure to add many wonderful memories for you and your family.

If you need inspiration about what flavor of ice cream to start with, we would like to suggest a few books on ice cream.

bookicecream

Chronicle Books

sweetcreamicecream

Amazon

Not only are the photos fun to look at but the recipes are delicious as well!

If you want to jazz up your homemade ice cream offerings you can get fancy with what you serve it in.   We love pretzel cones.  The Chocolate Stout Ice Cream would be so wonderful in these cones.

pretzelicecreamcone

Joy Cone

There are so many special memories about ice cream for us.  I can remember visiting grandpa and him making peppermint ice cream.  He would take the giant candy canes and smash bits of it to add to the sweet vanilla cream.  I haven’t had anything like it since.  We would love to hear about your ice cream memories.

I scream, you scream, we all scream, for ice cream

Vintage Ice Cream Shoppe by Modern Day Forager

I scream, you scream, we all scream for ice cream

Recipes by Rj of Urban Table
Photo Styling & Art Direction by Traci of Urban Table
Photography & Art Direction by Heather of Heather Gill Photography

Vintage Ice Cream Shoppe by Modern Day Forager

We all yearn for the days of the ice cream man, and our favorite quintessential summer time treat.  Well, we are here to tell you it is easier than you think, to churn out handcrafted artisan ice cream that tastes like an old fashioned summer.  We are pushing the flavor boundaries this week, while celebrating National Ice Cream Month with a few frosty and icy goodies we came up with.

Vintage Ice Cream Shoppe by Modern Day Forager

So here is our inside scoop, and  boy did we have fun.  We started with all-natural fresh ingredients and made our ice cream in small batches.  To ensure even more quality, we used our local sources and farmers, which gave us a better end result.  So no matter what your age, these recipes will make you as happy as when you were a kid,  running down the street with a big old grin on your face, your pocket change and crumpled up wad of dollar bills in hand, to be the first in line to get your favorite frozen novelties.

Enjoy!!!

Modern Day Forager
Follow my blog with Bloglovin

Street Food

Singapore by Modern Day Forager

Street Food

Street food is authentic, affordable and approachable; it pulls no punches and is straightforward.  We are hitting the pavement and eating curbside this week, no passport required!

Food hawking has long played a role in our rich global history; it links us to our past, another place, time, how we eat and how we explore.

Chances are, when you taste on the street, you are tasting a traditional family recipe, handed down from generation to generation.  This take-away fare is so satisfying, chocked full of flavor, honestly prepared and there is a sense of pride in every bite.

Singapore by Modern Day Forager

What we find so exciting about the street food scene is that it gives us a sense of continuity and community.  There is an informality that promotes ease, reassurance, and comfort when eating with your hands.  It truly has a way of uniting us all.

There is also a wonderful proficiency, resourcefulness and economy of effort of street traders.  Everything has its place and there is a rhythm , theatre, and  celebration of human ingenuity.

Singapore by Modern Day Forager

You walk up, take in the sights and smells, order your food, wait in line, and no matter what your economic background, everyone coexists and in the end, it is always about the food, how it is crafted and where it comes from.

So do the legwork and take to the streets, experience the outdoor food stalls, halls, trucks and street side vendors.   Culinary integration plus cultural diversity equals an experience that is a veritable moveable feast.

Singapore by Modern Day Forager

Enjoy!

Modern Day Forager

Melon Week (oh by the way, this is week # 9 for us)

Melon Week

Melon Week by Modern Day Forager

Celebrating the simple pleasures of summer, we are giving melons top billing this week here at Modern.  Summer melons are vibrant, fragrant, extremely versatile and bursting with fresh flavor.  Just one taste and you will sure to be hooked and stay cool all summer long with the season’s “hot” essentials.

 We have come up with a few questions we would love for you to answer

What is your favorite thing about summer?

What is your favorite summertime meal?

What are you reading this summer?

How do you stay cool and make the most out of these long hot days?

Relaxing by the pool, beach or are you having a big summer adventure?

Melon Week by Modern Day Forager

We love hearing from you, it is one of the best parts of our day.

Modern Day Forager

Open Faced Grilled Cheese with Creamy Tomato Soup

Grilled Cheese and Tomato Soup by Modern Day Forager

Recipes by Rj of Urban Table
Photo Style & Art Direction by Traci of Urban Table

Photography & Art Direction by Heather of Heather Gill Photography

Tomato Soup by Modern Day Forager

One of my most cherished memories of eating an open faced grilled cheese sandwich,  a steamy bowl of creamy tomato soup and a cold glass of milk, is when I was a little girl and my GG , would lovingly prepare me this meal for me whenever I was sick, stayed home from school, or needed some extra TLC.  There is just nothing better than having your Grandma take care of you and her making your favorite comfort foods.  I could always count on her to do that for me and make me feel special.   As a I grew older, the tables had turned , and I was the one lovingly preparing this recipe for my GG to comfort her when she was ill.  I will always be very grateful for the time I got to spend with her.

Ingredients:

For the creamy tomato soup:

  •             4 lbs. ripe heirloom tomatoes
  •             2 T olive oil
  •             1 T unsalted butter
  •             2 stalks celery, finely chopped
  •             1/3 cup shallots, finely chopped
  •             1/2 cup chicken stock, or as needed
  •             1 t fresh basil, chiffonade, extra for garnish
  •             1/2 t sugar
  •             1/2 cup heavy cream
  •              salt and freshly ground pepper to taste

Grilled Cheese and Tomato Soup by Modern Day Forager

For the grilled cheese: 

  • 3/4 lb. mild cheddar cheese, thinly sliced
  • 6 slices whole grain bread
  • 1/2 pound cream cheese, softened
  • 4 Tbs. unsalted butter, at room temperature

Directions:  To make the soup, preheat an oven to 400°F.  Lightly oil a rimmed baking sheet. Cut the tomatoes in half lengthwise and place them, cut side up, on the prepared baking sheet and brush with olive oil.  Roast until the tomatoes look somewhat shriveled, about 45-50 minutes.  Let cool for about 20 minutes.  Transfer the tomatoes and any juices to a food processor, pulse until chopped, then put the tomatoes and their juices through a food mill placed over a bowl.  You should have about 3 1/2 cups tomato purée.  Discard the contents and tomatoes skins from the food mill.
 
In a large saucepan, melt the butter over medium-low heat.  Add the celery and cook, stirring occasionally, until tender, about 5 minutes.  Add the shallots and cook, stirring occasionally, until softened, about 3 minutes.
 
Stir in the tomato purée, 1/2 cup stock, and the basil and bring to a simmer over medium-high heat.  Reduce the heat to medium-low and simmer, uncovered, for about 15 minutes.  Stir in the sugar. In 3 or 4 batches, transfer the soup to a blender and process until smooth.  Transfer to a clean saucepan; add the cream and heat until piping hot but not boiling.  If the soup seems too thick, thin with more stock.  Season to taste with salt, pepper and garnish with fresh basil leaves and serve warm.  To make the open face grilled cheese sandwiches; heat a griddle or 2 large frying pans over medium heat until hot.  For each sandwich, place one-fourth of the cheese on top of bread slice and top cream cheese, then layer with fresh tomatoes, season with salt, pepper and garnish with extra basil.  Place on the griddle, reduce the heat to medium-low and cook until the undersides are golden brown, 3–4 minutes.  Ladle the soup into warmed bowls.  Serve and enjoy!!!
Grilled Cheese and Tomato Soup by Modern Day Forager

Modern Day Forager

Grandma’s Donuts

HeatherGill-25

Recipes by Rj of Urban Table

Photo Styling & Art Direction by Traci of Urban Table

Photography & Art Direction by Heather of Heather Gill Photography

Donuts-3

Donut or Doughnut …no matter how you spell it, there may be nothing more satisfying to put in your mouth than a hot and fresh one of these old fashioned, hand-cut pieces of fried dough.

Ingredients:

  • • 4 cups flour
  • • 1 cup sugar
  • • 1 1/2 teaspoon salt
  • • 2 tablespoon baking powder
  • • 1/4 teaspoon nutmeg
  • • 1 cup milk
  • • 2 eggs, beaten
  • • 1 quart oil for frying

Powdered sugar and/or cinnamon sugar (I liked to switch off, while grandpa stuck with plain dunked into his coffee)

Donuts-6

Directions:

Pre-heat oil in a large Dutch oven or pot to approximately 375 F.

Combine flour, sugar, salt, baking powder and nutmeg.

Stir in milk and eggs.

(This step was done by hand on a large floured cutting board in grandma’s kitchen) Divide dough into easy to work with portion and spread out to about 1/4 inch thickness.

Cut out donuts (Grandma use two biscuit cutters to cutout donuts. She did not make donut holes so she just kept re-using the center piece.)

Once you have cut out all your donuts drop them into hot oil, just a few at a time. Fry about 3 minutes, turn and fry for about 3 more minutes or until golden brown.

Drain: (Grandma always tore a brown paper bag and set that on a plate to drain the donuts… never really a necessary step since my grandfather and I ate them as fast as she could make them, which always created plenty of giggles.)

Sprinkle with powdered sugar, cinnamon-sugar, or neither, just plain.

Eat and enjoy! 

Donuts-1

Modern Day Forager

Celebrating Our Grandmothers

Granny, grandma, grandmother, nana, nona. Whatever you called her we are celebrating her and time honored traditions this week.  For us at MDF, our grandmas centered around cooking, eating and family.   Their recipes were always lovingly prepared and harken back to a simpler time.  Everything depended on what was at hand, available and fresh in the garden and nothing was ever wasted.  No shortcuts were ever taken and many of the meals we have all grown so fond of, came out of the kitchen because of necessity to stretch a meal or a dollar.

grandma-2

Our grandmothers stories, recipes and wonderful anecdotes enriched our lives and awakened our love for food and feeding people.

grandma-5

grandma-4

Over the coming days we will share with you some charming stories, treasured family recipes, steeped in tradition and what we like to call “grandma-isms or  our version of grandma sayings.”   We would love to hear about your grandmother.  What do you remember about her?  Do you make recipes that she made for you as a child?  Please connect with us in the comments section or on our Facebook page.

grandma-1

vintage place mat photo by Bob’s Your Uncle

Modern Day Forager